CCM- IAB Configuration
IAB Cookie Banner Configuration
As of 2024, if the consent management platform on your website is not certified by Google, then certain functions, powered by Google, will not work. For example, AdSense cannot place ads on the website. However, to be certified by Google, the consent management platform must first be certified by the Interactive Advertising Bureau (IAB). To be certified by IAB, your consent management platform should be compliant with the technical specifications provided by them and should adhere to their standards. IAB certifies both consent management platforms and vendors.
Some of the key IAB specifications mandate that:
The cookie banner should clearly disclose all information about the associated vendors.
Choice to exercise (and update) consent should be available for each purpose and special feature.
An API should be exposed in the browser that communicates to vendors whether they can place cookies on the user's browser or not.
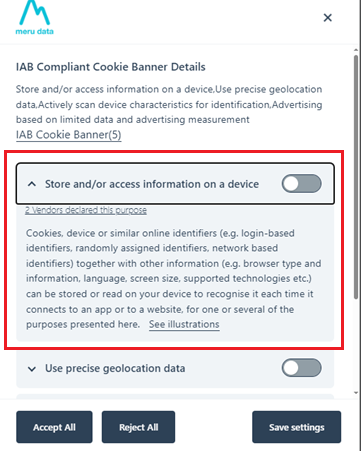
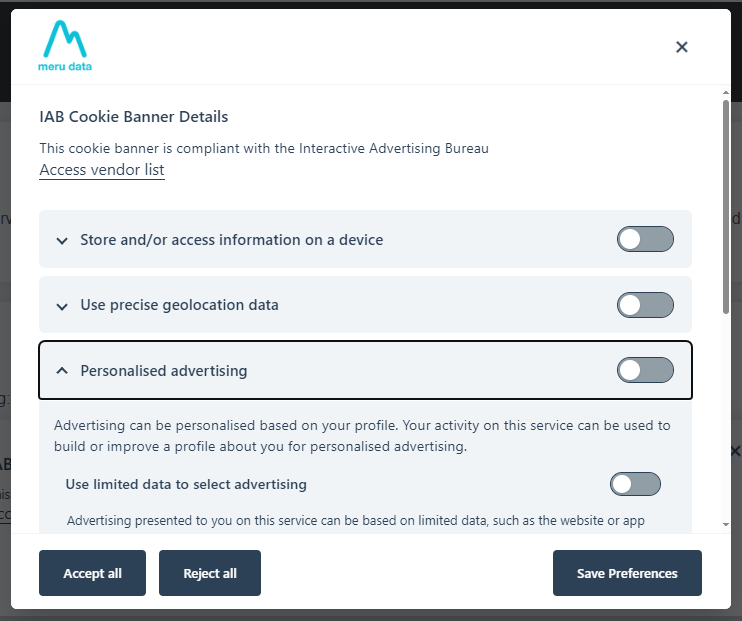
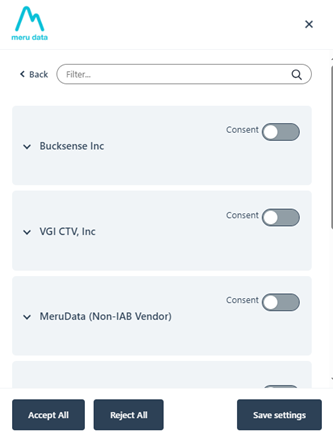
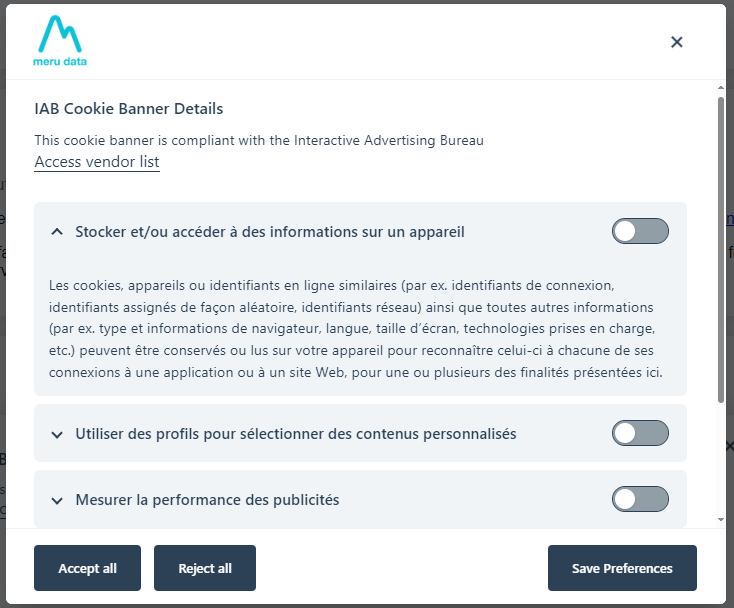
An example of an IAB compliant cookie banner is show below:
To configure an IAB compliant cookie banner, follow these steps:
On the cookie consent configuration page, click on the IAB Configuration button the top right of the screen
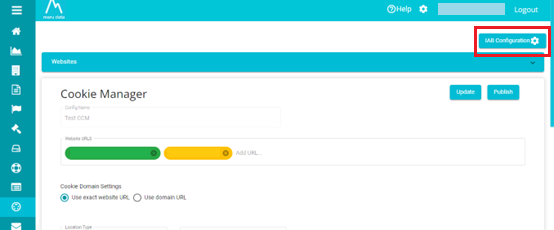
The IAB Configuration page will open
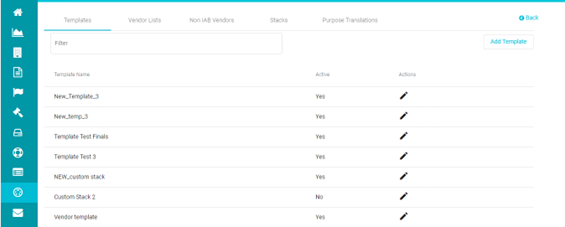
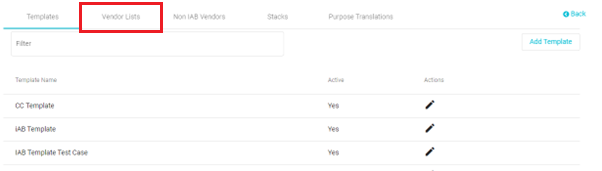
The IAB Configuration page has the following sections: Templates, Vendor Lists, Non IAB Vendors, Stacks and Purpose Translations. Let's look at each of them in detail
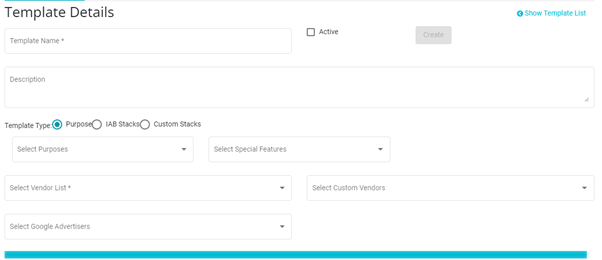
Templates
On this page, you can create a new IAB compliant cookie banner template or select an existing one. Edits and updates to existing templates can also be made from this section.
In this section, you can utilize the configurations made in the other sections (Vendor Lists, Stacks etc) to create the template you require. In other words, in this section you can compile configurations made in the other sections to create the required template.
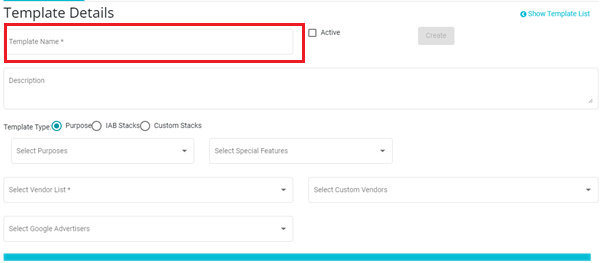
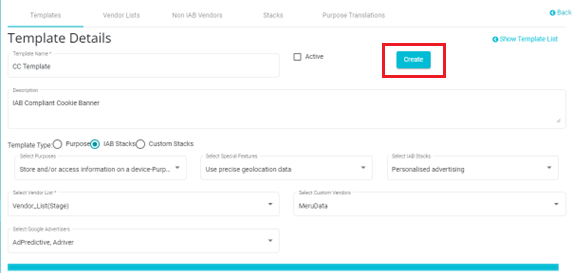
To add a new template: -
Click on the Add Template button
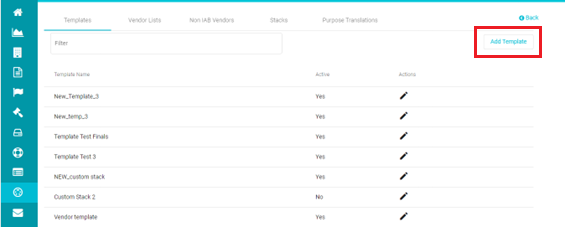
The template configuration screen will open
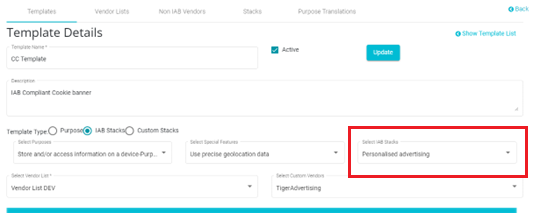
Type in the template name of your choice
Next, you can add a description for your template
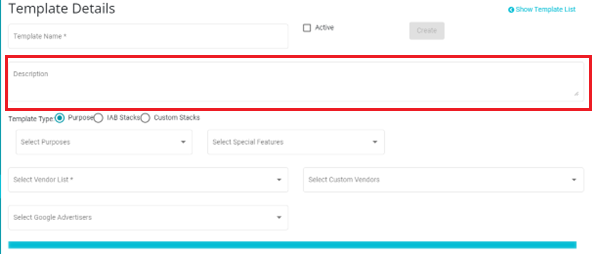
Next, select the Template type.
IAB specifies that the cookie banner should display the purposes of collection and special features. These purposes and special features are defined and provided by IAB.
IAB defines a purpose as "one of the defined purposes for processing of data, including users' personal data, by participants in the Framework that are defined in the Policies or the Specifications for which Vendors declare a Legal Basis in the GVL and for which the user is given choice, i.e. to consent or to object depending on the Legal Basis for the processing, by a CMP".
Examples of purposes are:
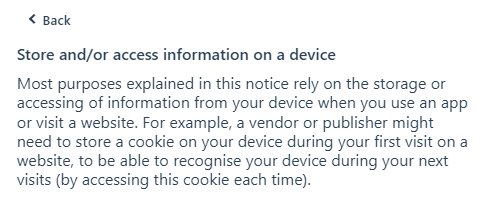
Store and/or access information on a device
Create profiles for personalized advertising
Measure advertising performance etc.
IAM defines special feature as *"one of the features of processing personal data used by participants in the Framework that are defined in the Policies or the Specifications used in pursuit of one or several Purposes for which the user is given the choice to opt-in separately from the choice afforded regarding the Purposes which they support".
An example of a special features is:
- Use precise geolocation data
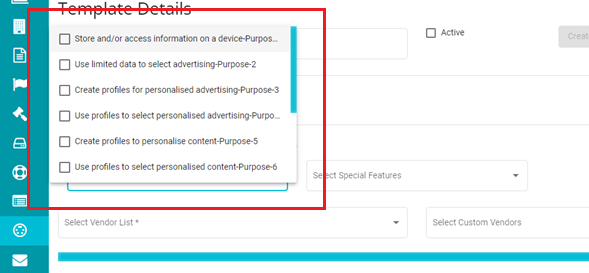
There are different template types to choose from. The first option is the Purpose Template. Choosing this template will display only the purposes and special features on the cookie banner.
- When you click on the Purpose Template type, two drop down menu's will be displayed.

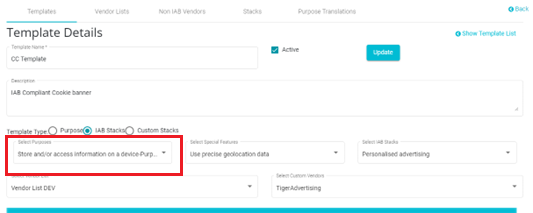
- From the Select Purposes drop-down menu, select the purposes, as provided by IAB, for processing data. Theses purposes will be displayed on the cookie banner
An example of Purposes displayed on the cookie banner is show below
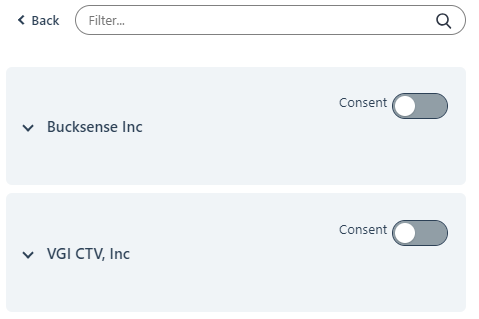
Here, users can view the list of Vendors that declare this purpose (collect data for this purpose).
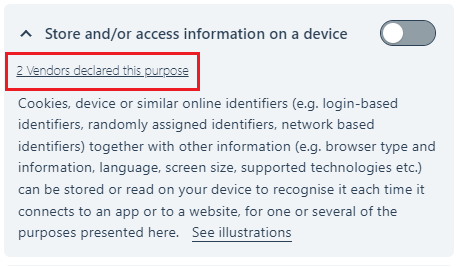
This list of declared Vendors is provided by IAB based on the purpose selected and the applicable vendors selected. In the example below, after clicking the 2 Vendors declared this purpose option, the user can view the two vendors that declare the purpose "Store and/or access information on a device"
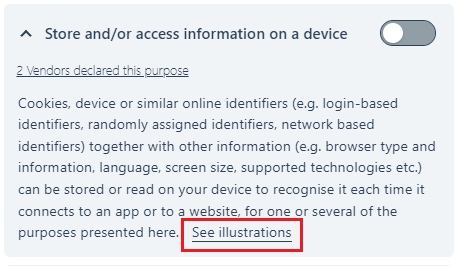
Users can also choose to see further information, with examples, of this purpose by clicking on the See Illustrations option
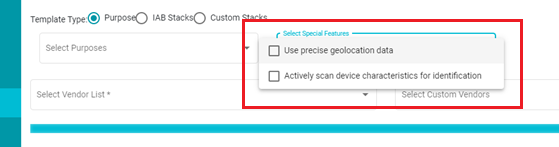
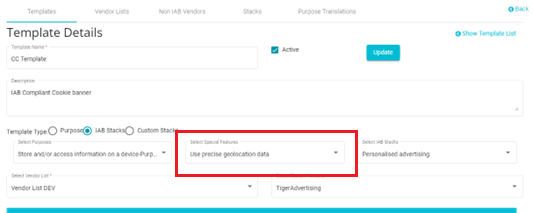
- Next, from the Select Special Features drop-down menu, select the applicable features of processing personal data. These special features will be displayed on the cookie banner.
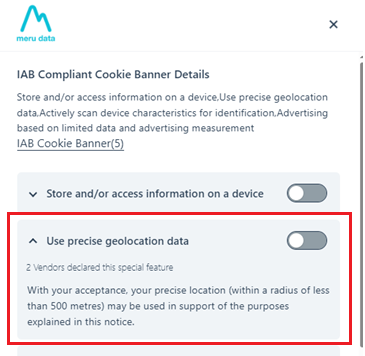
An example of special features displayed on the cookie banner is shown below
The next is template type is the IAB Stacks Template. A stack is a combination of purposes and special features. It is defined by IAB as "one of the combinations of Purposes and/or Special Features of processing personal data used by participants in the Framework that may be used to substitute or supplement more granular Purpose and/or Special Feature descriptions in the Initial Layer of a UI".
IAB themselves provides Stacks which can be seen in the Stacks section.
- Once IAB Stacks is selected as the Template Type, an additional drop-down menu appears; Select IAB Stacks

- From this drop-down menu select the predefined Stacks to be displayed on the cookie banner
Note: Each purpose can only be displayed once on the cookie banner. This means that once a Stack has been selected, other Stacks which have purposes that overlap with the selected stack will become unavailable, i.e., they cannot be selected as displayed in the example below
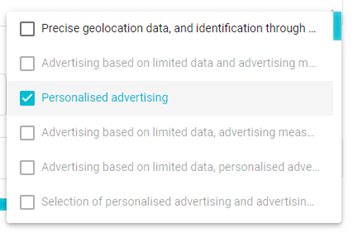
Note: Since each purpose can only be displayed one time on the cookie banner, once a Stack has been selected, purposes that come under the selected Stack, cannot be selected again on the purposes drop-down menu as displayed in the example below:
An example of the Stack displayed on the cookie banner is shown below
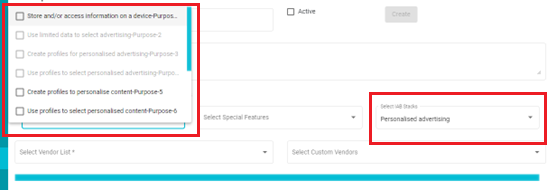
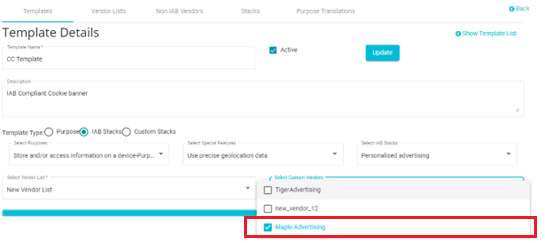
The last type is the Custom Stack Template type.
- On clicking this template type, all previous drop-down menus will disappear, and a new drop-down menu will appear; Select Custom Stacks
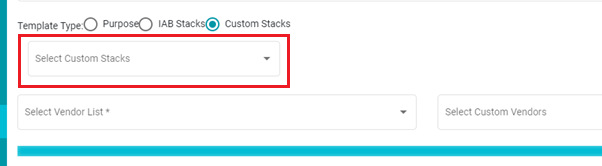
- From this menu, select any of the custom stacks that you configured in the Stacks section. A custom stack is a combination of purposes and special features that you have configured, i.e., not provided by IAB.
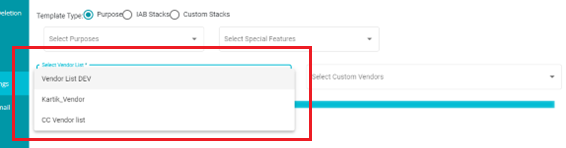
Next, from the Select Vendor List drop-down menu, choose vendor list of your choice to be displayed on the cookie banner.
This drop-down menu displays the list of vendors that are compliant with IAB. IAB themselves provides this list. Applicable vendors from IABs list can then be added to lists that you configure. These lists can be configured in the Vendor Lists section. Any active list configured in the Vendor Lists section will be displayed on this drop-down menu:
The Vendors list (IAB Compliant, non IAB Compliant and Google Advertisers) can be accessed by clicking on the corresponding button on the banner. Steps to configure the Vendors list button name are shown in the following section of this guide.
An example of the Vendors list on the Cookie Banner is shown below:
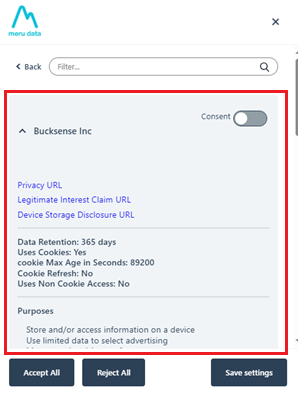
Here users can click on any of the vendors to view their details
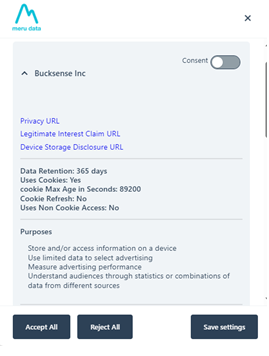
Here the user can see the following details about the vendor. These details have been provided by IAB.
Data Retention: For how long the vendor will store the data collected from the user
Uses cookies: Whether the vendor uses cookie storage (session or otherwise)
Cookie Max Age in seconds: For how long the cookie is stored in the user's browser
Cookie Refresh: Whether the vendor cookie will refresh once the cookie max age is reached. In other words, whether the consent preferences will be shown again once the cookie max age is reached.
Uses Non Cookie Access: Whether the vendor uses non-cookie storage and access to information already stored on a user's device.
Here the user can also see the purposes for collection, special purposes, features, special features and data declarations of that vendor.
Next, from the Select Custom Vendors drop-down menu, choose custom vendor list of your choice to be displayed on the cookie banner.
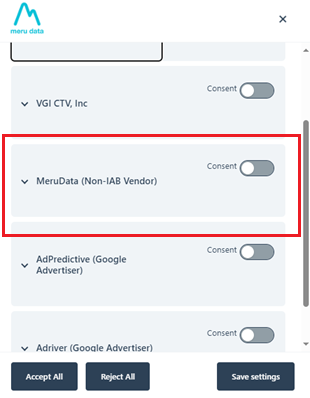
These lists are configured in the Non-IAB Vendors section and are comprised of applicable vendors that are not compliant with IAB.

Non-IAB Vendors will be displayed on the same Vendors list on the Cookie Banner
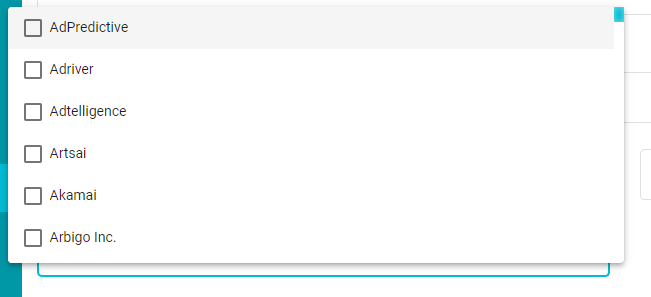
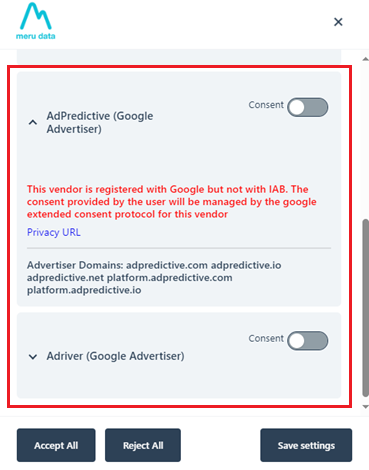
Next, from the drop-down menu, select the applicable Google Advertisers.
This is a list of Google Ads approved Advertisers or those Advertisers registered with Google Ads. From this list, select those advertisers who have placed their cookies on your website.
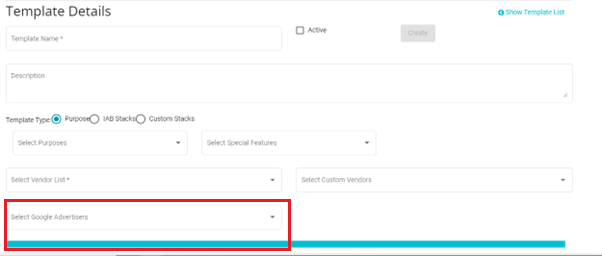
Google Advertisers will be displayed on the same Vendors list on the Cookie Banner
Once all the fields have been populated, click on the Create button
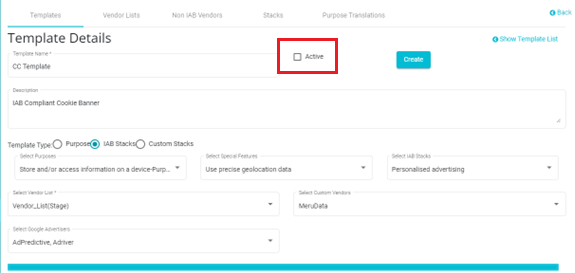
Once the template has been created, it needs to be activated for it to be published. To activate the template, check the Active box
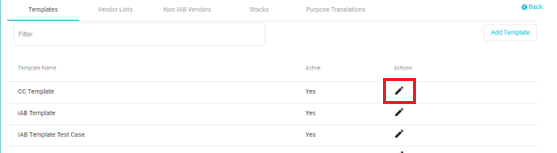
To edit an existing template, click on the edit button corresponding to that template
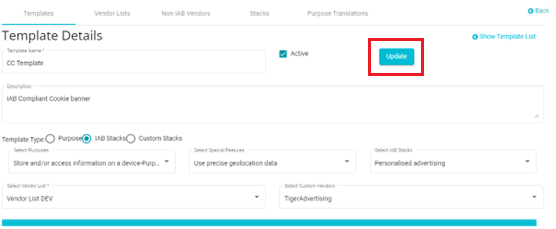
Once the edits have been made, click on the Update button to save the changes
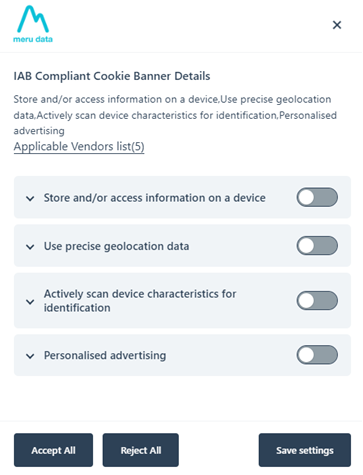
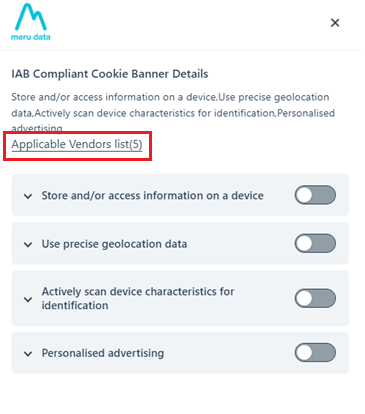
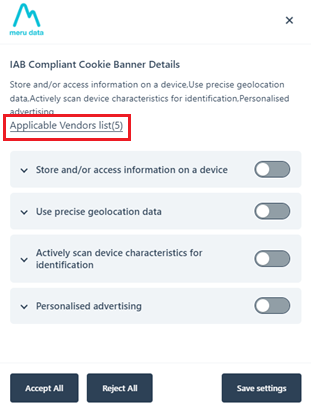
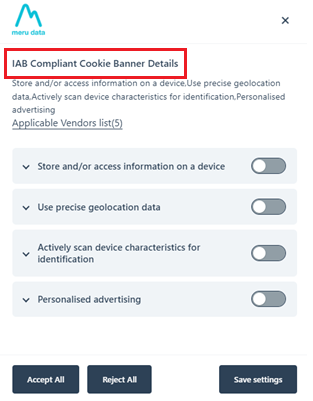
Based on the above template configuration, the cookie banner will look like this:
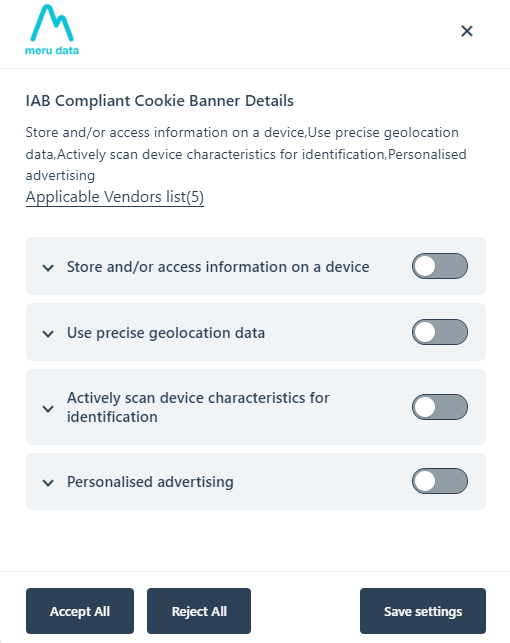
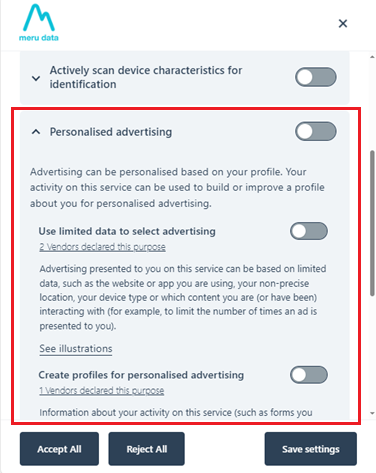
Here, Store and/or access information on a device is a purpose selected in addition to the selected Stack.
Use precise geolocation is the Special Feature selected
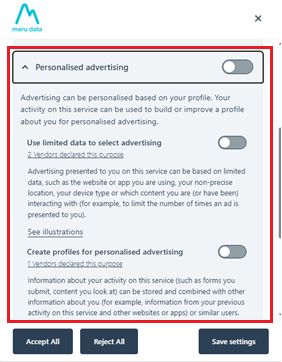
And Personalized Advertising is the Stack selected
On clicking on Personalized Advertising on the cookie banner, the purposes that fall under the stack will be displayed
To view the vendor lists (IAB compliant, non-compliant and Google Advertisers) click on the Applicable Vendors list button.
Note: This button can be edited. For example, you can choose to title this button "Show Vendor" list, etc. This button can be configured on the main Cookie Manager page under the Consent Modal.
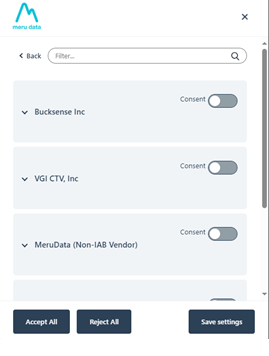
Once you click on this button, the IAB compliant vendors, non-compliant vendors and Google Advertisers list will be displayed
Click on any of the Vendors to view its details
Now we move to the next section of the IAB configuration.
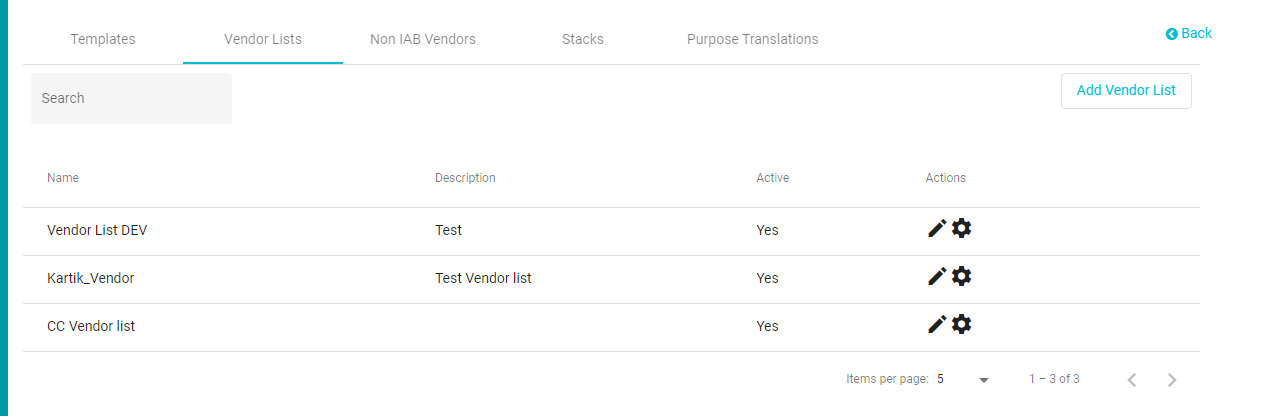
Vendor Lists
IAB mandates that all third parties who process users' data are listed on the cookie banner. Users can then choose to accept or reject their cookies. However, in some cases, third parties can collect certain data because of the legitimate interest clause. IAB provides a list of all vendors that are compliant with them. IAB's list of vendors is available here and from that list, applicable vendors can be added to your list depending on your requirements such as the geolocation of the website. This configured list will then be displayed on the cookie banner. An example of this is shown below:
On the Vendor Lists page, all vendor lists created by you will be displayed
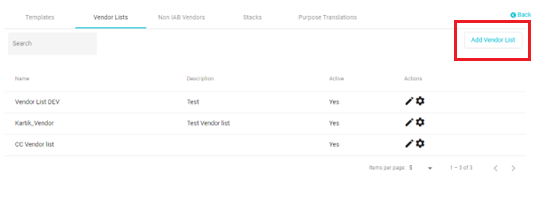
To create a new list:
Click on the Add Vendor List button
Here you will be able to add the List Name and a description for it

Once the two fields have been filled in, click on the Create button

Check the Active box if this list is to be used. Inactivated vendor lists will not appear while configuring templates and hence cannot be added to cookie banners.

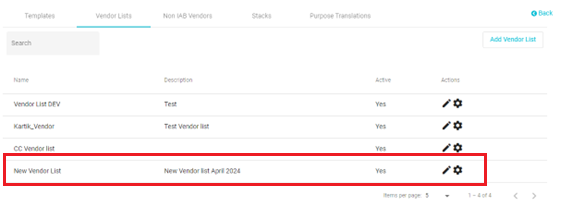
Once the new list has been created. It will appear on the Vendor List page. From here the applicable IAB vendors can be added to the list
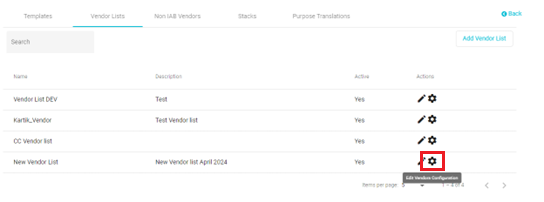
Click on the Edit Vendors Configuration button corresponding to your list
The Edit Vendors configuration page will open. This page displays the list of all IAB compliant vendors as provided by the Bureau.
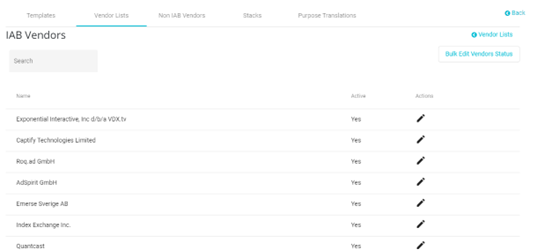
This list gets automatically updated every week to ensure it remains current with IAB. Vendors removed by IAB will be reflected here in this list

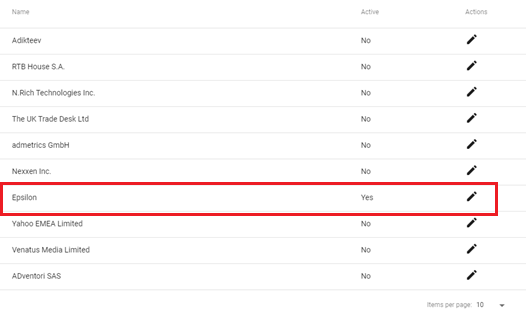
To add one of these vendors to your list, they must be Active. Inactive vendors will not be added to your list.
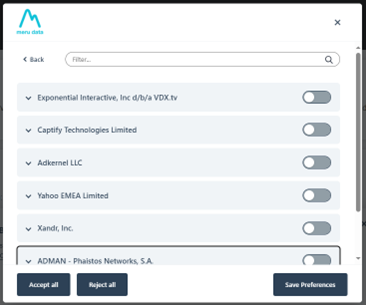
In the example below, only the vendor Epsilon has been activated and so only this vendor will be added to your vendor list
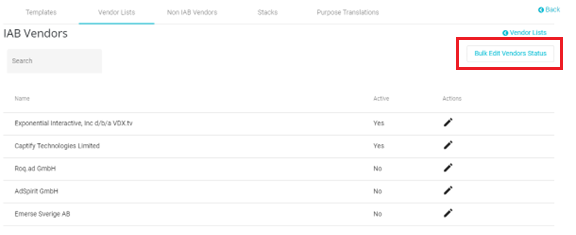
To activate or deactivate multiple vendors together, click on the Bulk Edit Vendors Status button
The bulk edit pop-up box will appear.
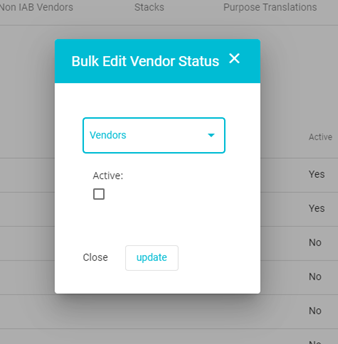
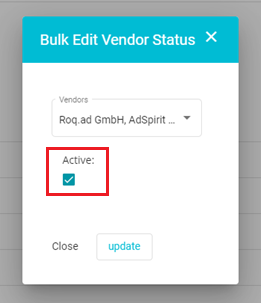
From the Vendors drop down on this box select those vendors whose status you want to update
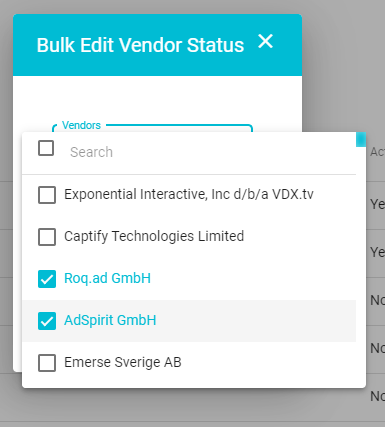
Once the selections have been made, check the Activate box
Alternatively, to inactivate active vendors, select those active vendors from the drop-down and leave the box unchecked
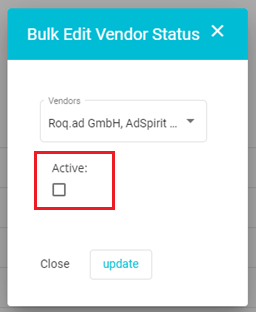
Once the selections have been made, click on the update button
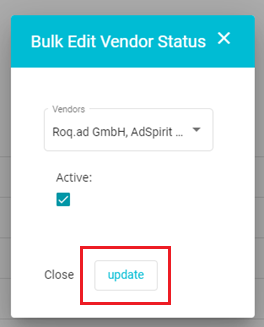
The status of the vendors will change according to your selection
To active a vendor individually, click on the edit button corresponding to it
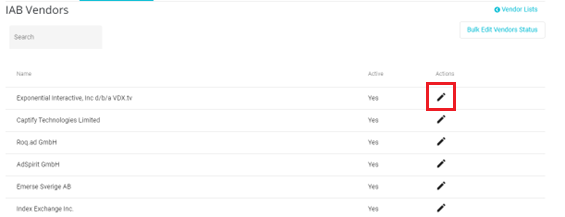
Here, the details of the selected vendor will be displayed. These details have been provided by IAB and cannot be edited. However, some purposes can be removed from the cookie banner and some purposes can be displayed under Legitimate Interests.
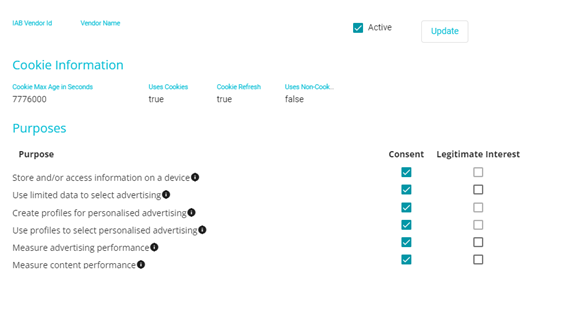
To activate the vendor so that it can be added to your list, check the Active box on this screen
On this page, you can also select what vendor data processing purposes are displayed on the cookie banner so that the users can make informed consent choices. The different purposes including those falling under Legitimate Interest will be specified so that the user can understand why the vendor is processing data. Further information about the vendor is also provided in this section of banner for the user's benefit.
If the consent box is checked here, then that purpose will be displayed on the banner under the vendor's name.
If the box remains unchecked, then that purpose will not be displayed on the cookie banner. Further, data will not be processed for this purpose by the vendor if the box is unchecked.
Only some purposes are applicable for Legitimate Interest (only the Legitimate Interest checkboxes for some purposes that are applicable can be checked).
If you check the legitimate interest box, then that purpose will be displayed under Legitimate Interest on the cookie banner. However, in this case, even if the user denies consent, some amount of data is processed.
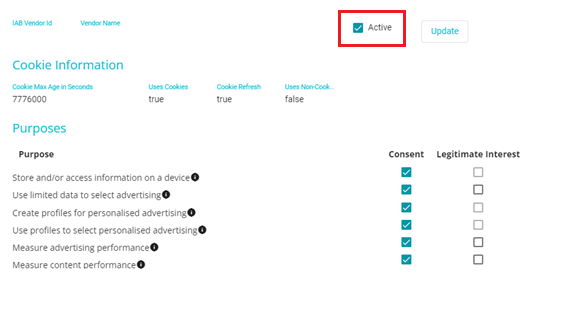
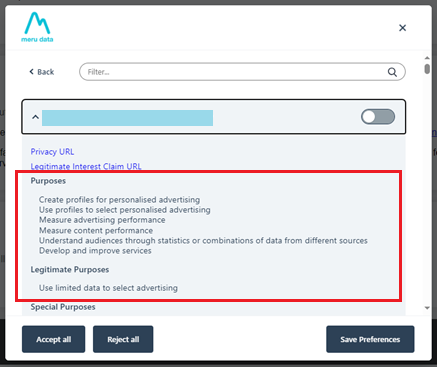
Consider the example below,
Store and/or access information on a device has been unchecked and hence will be appear on the banner
The Legitimate Interest checkbox for Use limited data to select advertising is checked.
Accordingly,
Store and/or access information on a device will not be displayed on the cookie banner and data will not be processed for this purpose.
Use limited data to select advertising will be displayed under Legitimate Purposes on the banner.
Both can be seen in the image below:
Once the required vendors have been activated, they will be added to your vendor list. In such a way, multiple IAB compliant vendors lists can be created. Depending on the geolocation of the users, different lists will appear on the cookie banner as applicable.
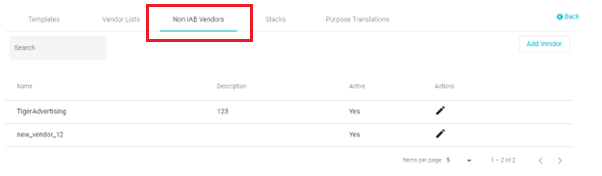
Non IAB Vendors
Your website may include third parties/vendors, who are not compliant with IAB, who process users' data. IAB mandates that a list of these vendors is also displayed on the cookie banner. Configuring the non IAB vendor list can be done in this section
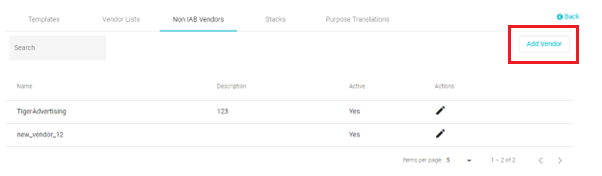
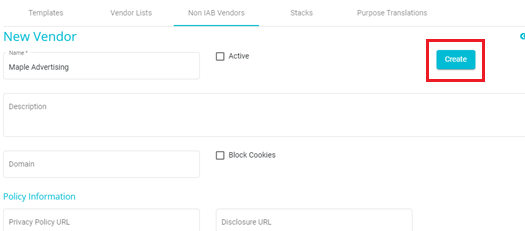
To add a new vendor:
Click on the Add Vendor button
The vendor configuration page will open
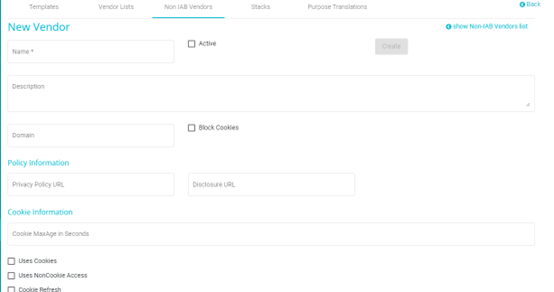
Here you can add the details of the vendor like their name, a link to their privacy policy, whether the vendor uses cookie storage, whether the vendor uses non-cookie storage and accesses information already stored on the user's device, whether the vendor refreshes cookies after the cookie max age has been reached, and so forth.
Once all the details have been filled in, click on the Create button
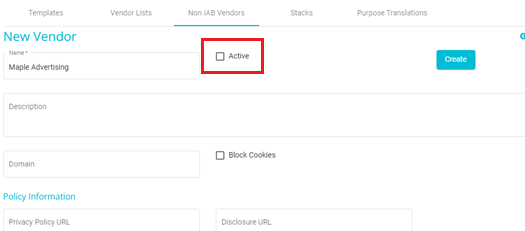
Check the Active box as only active vendors can be added to cookie banner templates
The newly created vendor will be added to the Non IAB vendors list
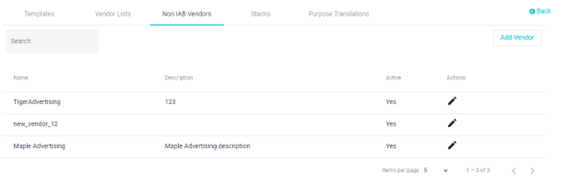
If activated, this new vendor can be seen on the Select Custom Vendors drop-down on the template configuration page
Stacks
IAB provides the ability to group purposes and special features and display them as a 'Stack'.
Stack means one of the combinations of Purposes and/or Special Features of processing personal data used by participants in the Framework that may be used to substitute or supplement more granular Purpose and/or Special Feature descriptions in the Initial Layer of a UI.
In the Stacks section you will the list of Stacks provided by IAB as well as custom stacks created by you if any
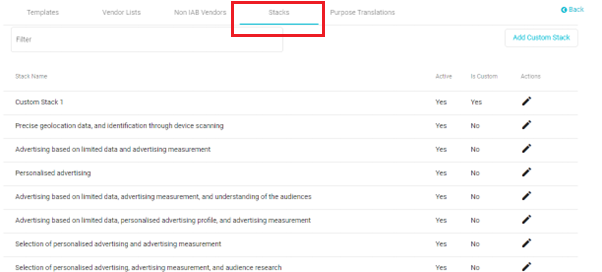
Stacks provided by IAB cannot be edited. On clicking on the Edit button against any stack, the Stack detail page will open. Here you can view the Stack details but cannot edit them.
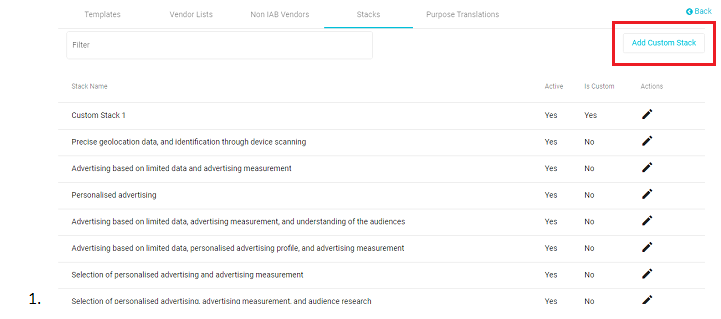
However, you can add customized stacks. To add a custom stack:
Click on the Add Custom Stack button
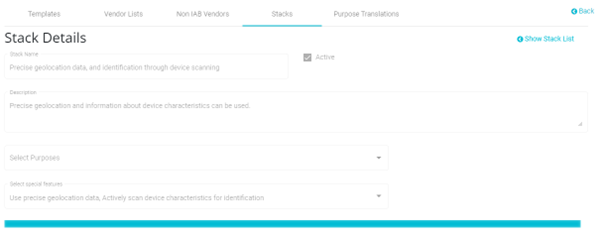
The Stack Details configuration page will open
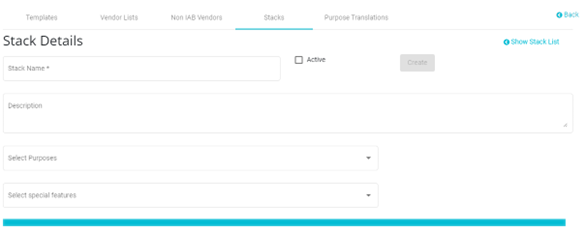
Here you can add the following details
Stack Name: Define a title for your custom stack
Description: Add a description for your stack
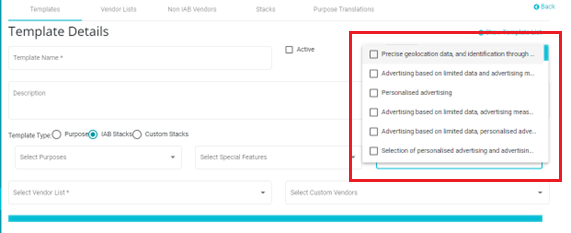
Select Purposes: From the drop-down, select the applicable purposes for data processing
Select Special Features: From the drop-down, select the applicable special features
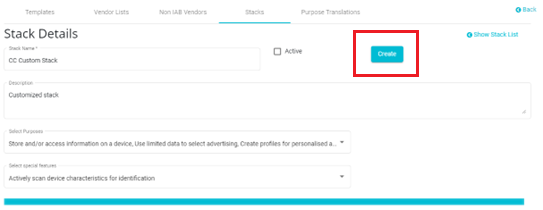
Once the details have been added, check the Active checkbox so that this stack can be selected when creating a template
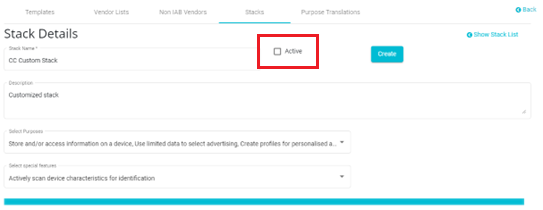
Click the Create button to save the Stack
Purpose Translations
IAB provides the ability to have the Purposes translated to the user's language. Depending on the geolocation of the user and the default language selected on their browser, the Purposes will be translated to the user's browser language. This happens if the user's browser language has been added to the language list in Purpose Translations section and if the cookie banner is configured for the geolocation.
For example, if the cookie banner has been configured for France, and the user is currently in France, and the user's browser language is French, and French is included in the language list on the Purpose Translations page, then the purposes on the cookie banner will automatically be translated to French. This is seen in the image below
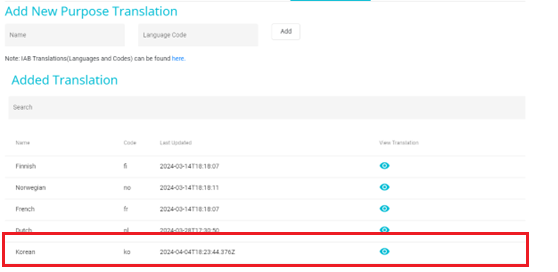
In the Purpose Translations section, the list of added languages can be found. The languages on this list have been added from the languages provided by IAB.
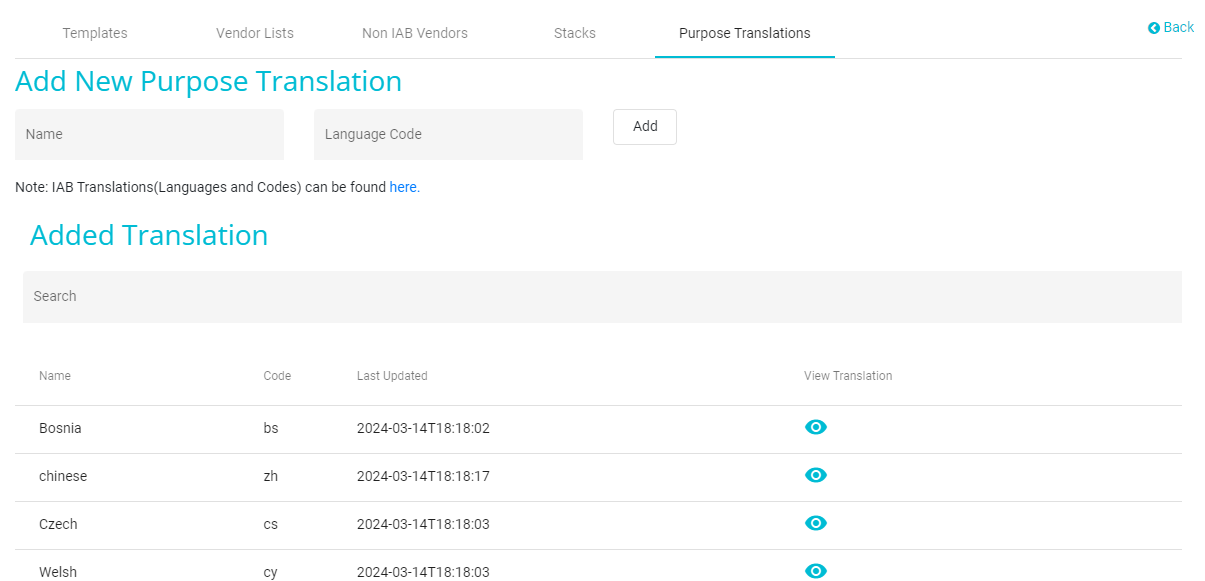
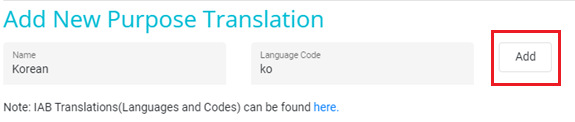
To add more languages:
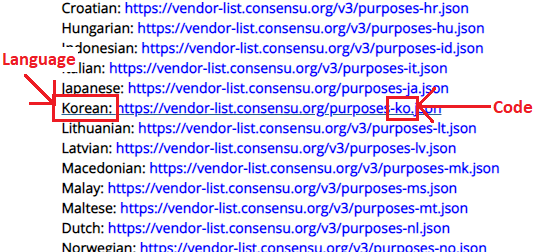
Click on the IAB Translations (Languages and Codes) link

You will be redirected to IAB's list of translations page
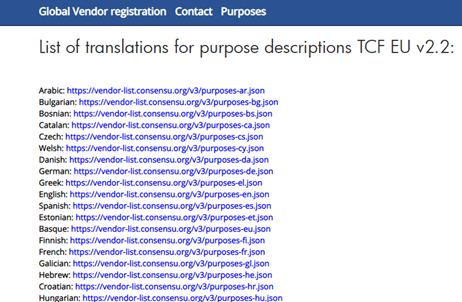
From here you can obtain the language name and language code
Back on the Purpose Translations page, you can enter in the language name and the language code in their respective fields
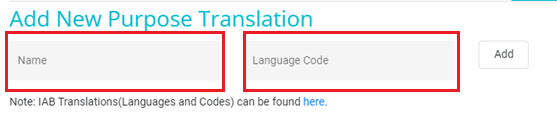
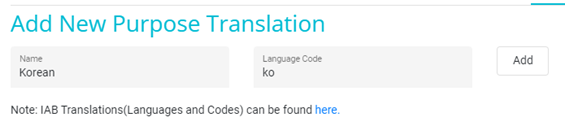
Click on the Add Button
The newly added language will now be visible on the languages list
Now that the configurations have been made and the templates have been created in the IAB Configuration section,
The appropriate IAB template will have to be selected
The needed locations will have to be added and
The required titles to direct users to the IAB sections will have to be defined
All this can be done on the main Cookie Manager page.
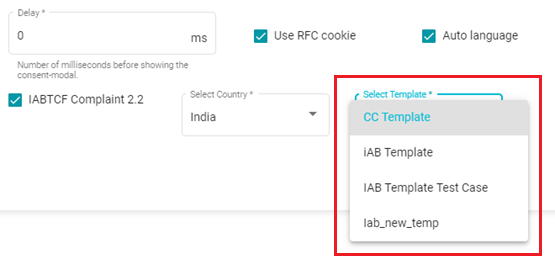
To select the IAB template:
Click on General on the main Cookie Manager page

In the General Configuration Section, check the IAB Compliant checkbox
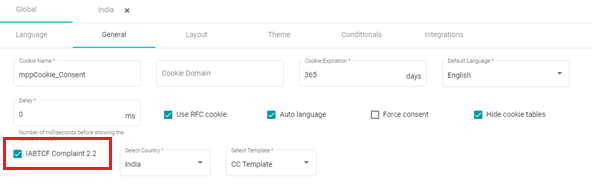
Next, select the geolocation that the IAB compliant banner will be applicable to. In other words, the IAB compliant section of the cookie banner will only be visible to users from the selected geolocation/country.
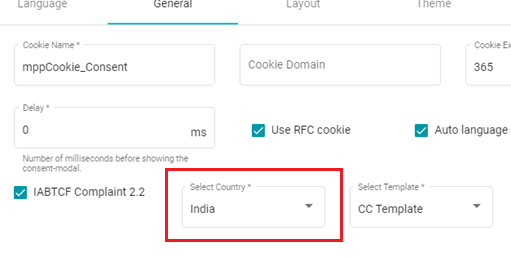
Finally, from the drop-down menu, select the required IAB template for the selected geolocation
Now, since the applicable location for the IAB compliant section has been selected, ensure that the same location is also selected for the overall cookie banner. This is because the IAB compliant section is a part of the overall cookie banner. So, if the IAB compliant section is applicable to one location, then the entire cookie banner will also have to be applicable to that location.
To select the location to which the entire cookie banner will be applicable, follow these steps (this has been covered in the first section of the guide):
Select the location from the Location Type drop-down
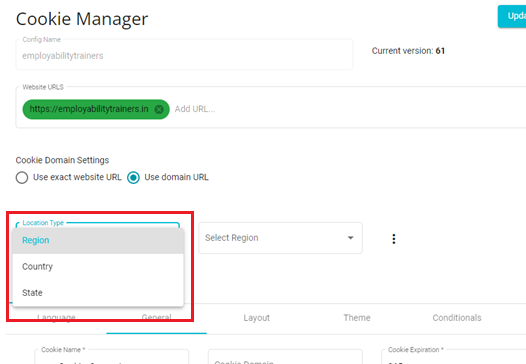
Here there are 3 options. Depending on the selection made here, you will then have to select the name of Country/Region/State of their choice.
This choice is made based on the location of end-users/website visitors using the website. If the primary customer base is in, for example, the state of California, then you will create a cookie consent configuration for end-users from California.
Different configurations are made for end-users from different locations to cater to the different laws and requirements of various locations.
Press on
 and click Add New Location to create cookie configurations for multiple locations
In this manner, you can create different cookie configurations catering to end-users from different locations around the globe.
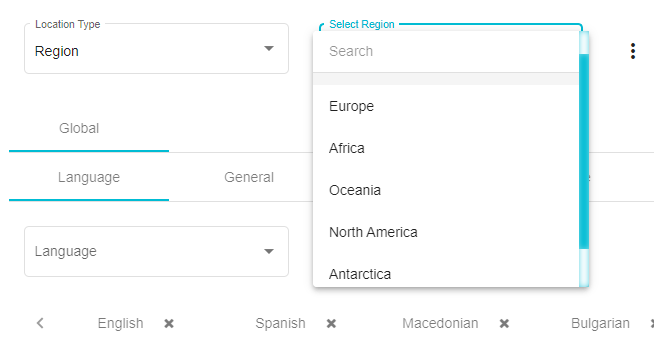
If Region is selected here, then, from the drop-down menu that appears, the user will have to select the specific region, as shown in the example below
If State is selected under Location type, then you will have to select the State as per their requirements

Note: If user has created multiple configurations for different locations, such as, for example, for Europe, for United States and for Texas, as shown below:

Then, a hierarchy is followed to select from among these configurations, which will be displayed to the end-user depending on their location.
If, for example, the end-user is visiting the website from Ohio, then it is checked whether there is an existing configuration for the State, here, Ohio. In this case, say there isn't a configuration for Ohio. Next, it is checked whether there is an existing configuration for the country. In this case, there is an existing configuration for the United States and hence that cookie consent configuration is provided to the end-user.
If there was no configuration on a Country level, then a Region level configuration is searched for. If there is no configuration on a Region level, then the default configuration -- Global is provided to the consumer. The Global configuration can be customized.
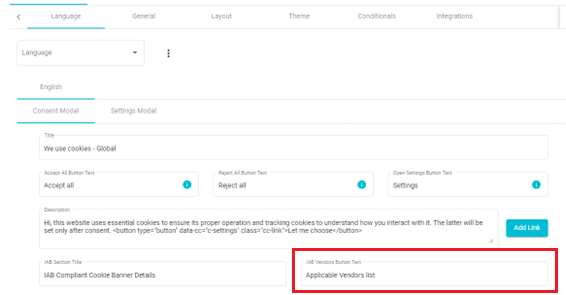
Finally, you need to define the appropriate IAB titles on the overall cookie banner. This is done on the Consent Modal section present on the main Cookie Manager page.
To add the necessary titles:
Go to the Consent Modal section on the main Cookie Manager page
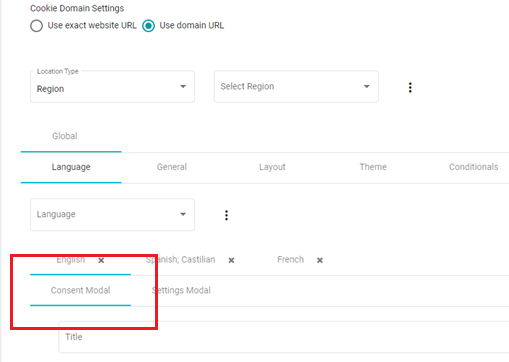
Scroll down to the bottom of the Consent Modal section to find the IAB

Here you can define the IAB section title
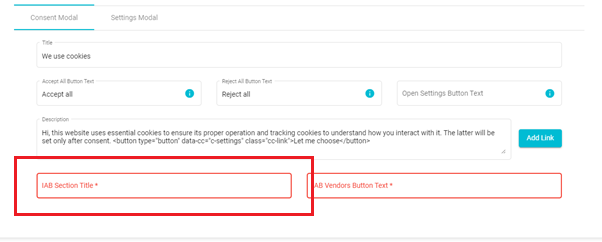
This is the title for the IAB section of the banner. An example is given below:
Next, you can define the title of the Vendor List button
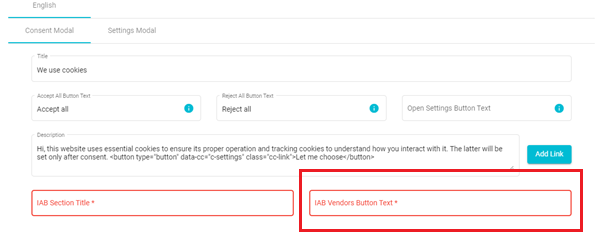
This button directs users to the vendor list that was added to the selected template.
An example is given below:
